Blog Archive

"Life is not measured by how many breaths we take, but by how many moments that take our breath away."

Blog Archive

About Me

My photo
I'm an Okie native, but currently an Arkansan. Newlywed. Hairstylist. Lover of all things creative. Pinterest and blog addict. Wanna-be photographer and wedding planner. Jesus follower. I love meeting new people and I'd love for you to stay a while, read a lot, and follow along. I love discovering new blogs so leave me a comment and I'm thrilled you're here!

Followers

Powered by Blogger.


Wednesday, August 28, 2013

Wedding Wednesday #7- Angel Bell Choir

 
Instead of going the traditional route and having a flower girl and ring bearer, I did something a little bit different...and some would call it a little bit crazy. In place of a flower girl and ring bearer, we had a 17 piece angel bell choir. And I must say, it was the cutest darn bell choir I've ever seen. You see, I have a huge family and most of my cousins have young kids and I just couldn't choose between them all. I love them all so much. Therefore, we decided to include them all. They walked down the aisle before I came out ringing real hand bells that the church provided. They didn't ring a special melody, they just all rang however and whenever they wanted, but they picked out bells that would sound good together. All the boys and girls wore white and khaki and they looked so cute.
 
I'm not going to lie, I wondered if it would go smoothly with that many kids sitting through a wedding, but to my surprise, they were phenomenal. Not one of them made a peep, they did exactly as they were supposed to and it turned out great. When all those kids and their parents showed up to the rehearsal, I will admit, I thought to myself, "oh man, what have I gotten myself into." It was like a zoo full of people and kids in that church and I just knew we would never get them all to be quiet or cooperate. They proved me wrong. The pastor whistled for everyone to sit down and be quiet and the rest of the rehearsal, they were dead silent and did exactly as told. It went by smoothly and quickly. I was so impressed with them! They were so well behaved.
 
I didn't get to see them process in at the wedding because I was in the back, but everyone told me they were fantastic. I got so many compliments on the angel bell choir. A lot of people told me that that was one of their favorite parts of the wedding.
 
Just a few days ago, I got our full wedding video back with footage of the entire ceremony. I watched it as soon as it came in the mail. I was so happy to finally get to watch the bell choir process in. They were darling....and they made me cry. I'm so happy they were all a part of our wedding....and I hope they had fun doing it!
 
 How do you get that many kids to look at the camera and smile all at once? With an amazingly patient photographer. It wasn't easy, but I'm so glad we have this picture!
 Seriously, how cute is this picture? I absolutely LOVE IT!! Definitely a framer.
 ....and the ringing begins
 The little one in the front was the youngest one. She had just turned two.


To read more about how I asked the kids to be a part of the wedding, you can read my blog post here: http://quinceetaylor.blogspot.com/2012/10/psalm-1273.html
 
Stay tuned next week for the getaway rig and probably one of my favorite memories from the day!

Tuesday, August 27, 2013

Coffee Filter Lamp

 
I've been wanting to make something out of coffee filters for a long time. I've seen a lot of different projects using them and one of my favorites is the coffee filter lamp shade. I got a new lamp base last week from Target and I already had the lamp shade so I decided to try it out!
 
This is the link to the tutorial I used: http://www.lizmarieblog.com/2011/04/coffee-filter-lamp-shade/. Her coffee filter lamp shade was the first one I ever saw and I fell in love with it.
 
Here is a picture of my inspiration from Lizmarieblog. *Note- hers turned out way cuter than mine did. I don't think I folded mine is as many times as she did.
 
BEFORE:
 
AFTER:


It was a very cheap project. I used about 250 coffee filters and it took me a couple of hours. The lamp has found its home on our night stand in the master bedroom.

Monday, August 26, 2013

Be Our Guest- Guest Bedroom Reveal!


 We are so excited that this upcoming weekend and the next, we are expecting our first house guests since we've been married. My mom and grandpa will be in town to visit this weekend and my aunt will be in town the next. None of them have been to visit yet and we can't wait to show them around the town and show them hospitality in our home. We have a lot of fun things planned, including: antique shopping, golfing, visiting some waterfalls and caves, evening/morning walks around the spring with Samson, going to church.....there are lots of memories to be made.
 
In preparation for our first guests, I have been working hard on our guest bedroom ever since I moved in. That was my top priority. I knew that I wanted our guests to be comfortable and at home when they came to stay. We really look forward to having our friends and family come visit and see where we live. My goal was to make this room bright, cheery, and inviting.
 
Here is a before picture of the room when Aaron first moved in:
 
Looks like your typical bachelor pad right?
 
And here it is now:
 
 The quilt and pillows are from Target.
 
I got the yellow end table at a yard sale for $25. I'm still looking for a cute basket to put in the bottom. The lamp is something I bought at an estate sale and re-did. The lamp shade is from Target. The candle stick and flower vase are from boutiques.
 I got the red chalkboard 50% off at Hobby Lobby and I wrote on it with a chalkboard marker. I stole the idea from Pinterest, but I love it! The blue things are candle stick holders that I bought from a garage sale. They were gold when I bought them, but I spray painted them blue. I still need to find candle sticks for them.
 The end table on the right is also from a garage sale. I am still trying to decide what color I should paint it. If I do it yellow like the other, do you think that will be too much yellow? Suggestions are appreciated!
 The headboard is actually my parents old wooden headboard. My mom and I recovered it with fabric when I was in college so all I had to do was rip the old fabric off and staple the new yellow chevron fabric on. The headboard is probably my favorite thing about the room. I love all the different patterns.
 A view from the other side of the room.
 This is the other side. I still need to make some curtains for the window. The rod iron candle holder on the right is also something I bought at a garage sale years ago.
 This chair is not going to stay here. There is no room for it so I'm giving it to my mom. I bought it at a garage sale for $10 and painted over the fabric. My mom is going to have it reupholstered.
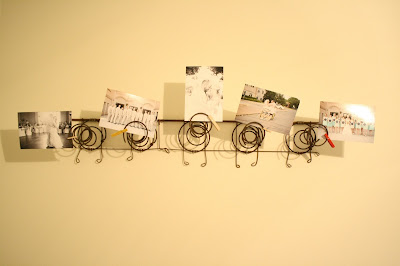
 This is a wedding gift that we received this weekend. It's a cute little mattress spring wall hanging. I wasn't quite sure how to style it so I just paper clipped some wedding pictures on it. I'm going to find something cute to hang from the little hooks on the bottom. Maybe some dried flowers or something. I love it though and think it's very unique, eclectic, and thrifty so of course I'm sold.
This is what the wall on the left side of the room looks like. I already had some white shelves that I used in my old room, so I painted them mustard yellow and put a few picture frames on them.
One of my favorite wedding pictures.
A few more wedding pictures.
 I bought these blue vases at Goodwill years ago for $.50 a piece. I had forgotten about them and when I dug them out of a box, I knew exactly where I wanted them.
I also found this cute light switch plate from Hobby Lobby for 50% off and knew I had to have it since it matches the room!
 
One thing I wish I could do is paint the walls in this room. It drives me crazy having all white walls so I feel like I have to bring the color in through decorating. There is definitely a lot going on in this room, but I am pleased with how it turned out and it cost me next to nothing since most of it I already had, or was given to us as a wedding gift!


Wednesday, August 21, 2013

Wedding Wednesday #6- Bride & Groom Cakes

 
I'm a little late on today's post.....sorry about that. I was busy last night and this morning getting things together and writing my "matron of honor" speech for my best friend's wedding this Sat!!! WOOOHOOO. Excited is an understatement. Can't wait to celebrate with her and see all my family and friends.
 
When picking out my cake, I knew exactly what I wanted. I had to have at least one layer that was all rosette flowers and one layer that had ruffles. One of the hardest things for me to decide on was who to hire for my cake. Everyone that was in my price range either used fondant or didn't know how to do the ruffles and flowers. I was seriously shocked at how high cakes cost these days. Most people were trying to charge me between $4-$6 a slice and when you're serving at least 300 people, it just wasn't in our budget. Luckily, one day I hit the jackpot! I found Rosebeary's Designs in Baking on Facebook and I decided to contact her. Then, I saw her work in Brides of Oklahoma and got sad because I thought that meant she was going to be super expensive. I cannot tell you how relieved and excited I was after I met with her. She was amazing! She could do exactly what I wanted and we designed the cake together and she was affordable. She gave me the best price of anyone else around. I was thrilled! I hired her on the spot and knew it would be a gorgeous cake. *Note for future brides....you will save a lot of money if you have a smaller cake and serve the rest as sheet cakes. No one will ever see the sheet cakes, all they will see are the slices of cake. We ended up deciding on a 4 tier cake, each layer a different flavor and then two sheet cakes. I chose white wedding cake, strawberry, carrot, chocolate almond, and german chocolate as our flavors. I got a lot of compliments on how pretty and tasty our cake was. I found that it was hard to find someone that makes it look pretty and taste good at an affordable price. I'm so thankful we found Janet!


I collect Willow Tree Angels so when I heard they had a cake topper, I knew we had to have it. I added my own little touch to it by gluing a veil on the girl. Now we have it sitting in our living room on a coffee table.
 
I asked Aaron what he wanted his groom's cake to be. His first response was a turkey because his favorite thing to hunt is turkey. I wasn't really a huge fan so I suggested a few other things. My mom came up with the idea of his cake being a camo baseball hat with Oakley sunglasses on the brim of the hat. If you know Aaron, then you've probably noticed that he's rarely ever without the two. Aaron approved the idea and thought it was pretty good.....that was until I mentioned an Arkansas Razorback cake. He was immediately sold. You see, Aaron does not like OU at all. When he found out that our reception was going to be held at the OU ballroom, he wasn't very happy about it. That's when we made the agreement that his cake would be Arkansas Razorbacks if we had our reception at OU. I thought it was fitting, considering that we would be living in Arkansas after getting married and since we met each other in Arkansas. It was also a requirement that the cake said "WOO PIG SOOIE."
 
My friend, Chelsea made Aaron's cake. I knew from the minute we got engaged that I would be calling her for his cake. We played volleyball together in college and I remember seeing some of her work back then. It was phenomenal. She is seriously talented and makes the cutest cakes ever. We worked together on a design and it turned out perfect. I really wanted the bride and groom razorbacks on the top of the cake. She made them out of rice crispy treats so they were edible. It turned out exactly how I imagined in my head and Aaron was obsessed with it. All night he kept saying, "did you see my cake? How awesome was that? I really hope the photographers got a picture of it." He was so proud of it. Aaron requested that the top layer of his cake be Funfetti. That is his favorite kind of cake. The bottom tier was plain chocolate.  Thanks Chelsea, you're the best!


Stay tuned next week for the cutest little angel bell choir you've ever seen!!

Tuesday, August 20, 2013

Before & After- A Bathroom Shelf


I can finally say that I have successfully tried Annie Sloan Chalk Paint......and I am now a firm believer in it. I have been curious about the paint for a long time, ever since I saw it all over the blog world and Pinterest. I held off trying it for so long because it was so expensive and I didn't want to spend that much on paint and not know how to properly use it. I found a darling boutique within 20 miles of my house last week and I heard they sold Annie Sloan so I had to go check them out. I talked to the lady that worked there for 15 minutes about how it works. She showed me different projects she had done with it and gave me some ideas. I ended up leaving there with a can of paint in the color Arles and a can of clear wax. It was not cheap and I immediately regretted my decision. Since I spent so much on it, I decided to do a ton of research first. I read blog after blog and finally felt secure enough to test it out.

source:http://emilyaclark.blogspot.com/2012/05/our-yellow-door-and-annie-sloan-chalk.html
 
I was told that this paint required no sanding, priming, stripping, etc. and it could pretty much cover any surface in 1-2 coats. I painted a shelf that looked like wood, but it was actually that fake plastic wood. I was worried how it would cover and work on that type of surface. I'll be honest, I did have to use 4 coats of paint, but I did not do any prep work and that was worth it to me! It dries super fast so I did two coats back to back and then did the other two coats the following day. After all the painting was done, I let that sit for about an hour and then I went over it with the clear wax. After the clear wax, I distressed it with 100 grit sandpaper. Then, I went over it again with another coat of wax. Sounds like a lot of work, but it was really easy. It did take a few days though. I am super impressed with the way it turned out. You cannot tell that the shelf isn't made of real wood and it has a smooth, finished feel to it.
 
I only used about 1/4 of my can of paint so I will get a lot for my money. I also used only a tiny bit of the wax. A little goes a looooonnnngggg way. Now I want to get every color of Annie Sloan Chalk Paint and go to town on every unfinished piece of furniture in my house.
 
I bought the shelf at a friend's garage sale a few years back. Thanks Lydia for having a fabulous garage sale and providing me with furniture for my house!
Here it is before:
 
 And after:
 I got the apothecary jars from TJMAXX for $5.99 a piece. I'm trying to find two more baskets that match the one on the middle shelf to put the toilet paper in.
 You can kind of see the distressing that I did on the ends of the shelf and the legs.
This shelf is great because we don't have a lot of storage space in our bathroom so it is very functional and it adds a pop of color! I have a few more things left to put on the walls and then I'll share the entire bathroom re-do.


Thursday, August 15, 2013

8.15.2012


...Was the day that Aaron proposed. Man, how time flies when you're having fun. I can't believe it has already been a year. I feel like it was just yesterday that we were moving Aaron into his new rent house in Arkansas. It's crazy to think how much things can change in a year. Now we are married and both living in the same little house and loving it. I went back to last year's blog post about the proposal and re-read what I wrote. I wanted to reminisce and remember exactly what I was feeling that day. That's why I love blogging so much. It really is fun to read old posts and re-live special life changing moments.

I was folding clothes the other night in our bedroom and Aaron came in to help me. I told him thanks for helping and that I really appreciated it.....to which he replied, "but wait, I thought you liked folding my clothes in this room because it reminds you of when I proposed." He got me. Those words did come out of my mouth and I re-read them again in my blog post from last year. I made sure and told him that just because it reminded me of that, doesn't mean I like doing laundry alone :) Aaron is seriously the sweetest husband. He has been so good to me and we have thoroughly enjoyed being married to each other and living under the same roof. It is crazy how much my love grows for him everyday and how excited I get when he comes home from work. I am so thankful he asked me to marry him a year ago today! Saying "yes" was the best decision I ever made.


I found this quote on Pinterest a while back and I fell in love. I thought it was fitting for the occasion so I wrote it on our chalkboard in the kitchen. We still love our little house and all the memories we've already made in it!

To read last year's proposal post click here: http://quinceetaylor.blogspot.com/2012/08/i-have-been-waiting-very-long-time-to.html

Wednesday, August 14, 2013

Wedding Wednesday # 5- Party Favors


I originally decided that we wouldn't have party favors at our wedding...that was until my best friend text me about an awesome deal on koozies. I couldn't pass it up. I didn't tell Aaron about them and he was completely surprised when he saw them. He loved them!

The front of the koozies had our initials on it and our wedding date. The back had a little touch of Aaron on it since he is an avid hunter.

 We displayed the koozies in an old galvanized tub that I bought at a flea market. I wrapped it in burlap ribbon and my mom made an elastic strip of lace to go around the top. I spray painted a dollar tree plastic platter with mint green spray paint and chalkboard paint. Then, using a chalkboard marker, I wrote the saying, "To have and to hold and to keep your drink cold. Please take a koozie."
We saved a handful of the koozies to take home with us and give to our friends. It's fun because when we have cookouts, they will be using our wedding koozies.....and most of them are already stained brown. They've definitely gotten good use out of them :)

Wednesday, August 7, 2013

Wedding Wednesday #4- Our Honeymoon

 
Let me preface this post by telling you 3 things:
#1. Prior to our honeymoon, my husband had never flown.
#2. He had also never seen the ocean.
#3. I wasn't quite sure how adventurous he was, knowing that he hates heights and roller coasters.
 
I was a wee bit anxious to see how Aaron would handle all of the above, but let me tell you, it was so fun to experience those things with him for the first time. I learned that he is extremely fun to travel with....so easy-going, care free, and to my surprise...full of adventure. I was so shocked at some of the stuff he did without even saying a word. Our honeymoon was perfect! Far better than I could have ever imagined. I was in serious relaxation mode. Aaron kept having to check on me and make sure I was alive because there were times when I went into pure zombie mode....not a care in the world. That was exactly what I needed after the crazy 10 months of planning a big wedding.
 
We stayed at El Dorado Seaside Suites in Cancun, Mexico. I highly suggest this resort. It is small, adult only, and very quiet and relaxing. The food was fantastic....there wasn't one thing we tried that we didn't like.
 
I'll let the pictures do the rest of the talking.
 At the airport, ready for his first flight. He ended up loving it and will definitely be flying again!
 The view of the lazy river from our balcony.
 The inside of our room.
After dinner one night....about to watch the storm roll in on the beach beds.
 Honeymoon selfies are a must if you want any pictures together.
 We swam in a cave. That's Aaron diving in.
 The water was crystal clear.
We zip-lined across this lagoon filled with crocodiles.....very intimidating.
 We went to a modern day Mayan village and watched a Mayan show inside of a cave....kind of creepy, but very interesting.
 We didn't get fireworks on the 4th of July, but we got a fire show on the beach instead. This guy was twirling a stick of fire around on his feet.
 We also saw a Mexican circus. As you can see, we took full advantage of the nightly entertainment that our resort provided.
 We got pulled by dolphins.
I look a little terrified.
 We skied on the tips of the dolphin's noses.
One of the coolest things I've ever done.
We got to play and swim with sea lions. They were a lot cooler than I expected.
We spent most of our time here, laying on the beach and soaking up the sun. Aaron was so amused by all the sea life and coral. He could have swam around with his goggles on for days. It was really cute to watch him....he was like a little kid in a candy shop.
 When the weather was rainy, we painted pottery for souvenirs. I love the way our new chip bowl turned out.
 Our last night :(
A rooftop dinner.
 My handsome husband.
 Soaking up our last hour of vacation before heading to the airport.
 Honeymooners
Cheers to Cancun!

Oh how I wish I could snap my fingers and be back there. Instead, it's back to the real world and jobs and chores and writing thank-you's and enjoying our new life together :)